Arduino 數位光強度檢測模組 實作
題目
使用一顆 12V 電燈
讓一區域維持在 500 lux
過程中 Arduino 使用 PWM 讓電燈有漸變的效果
當該區域 lux 愈高時,電燈亮度越暗
當該區域 lux 愈低時,電燈亮度月亮
材料
- 1kΩ 電阻 ( 棕黑紅 ) X1
TIP120電晶體 X1GY-30數位光強度檢測模組 X1- 12V 電源供應器 X1
- Arduino Uno 板子 X1
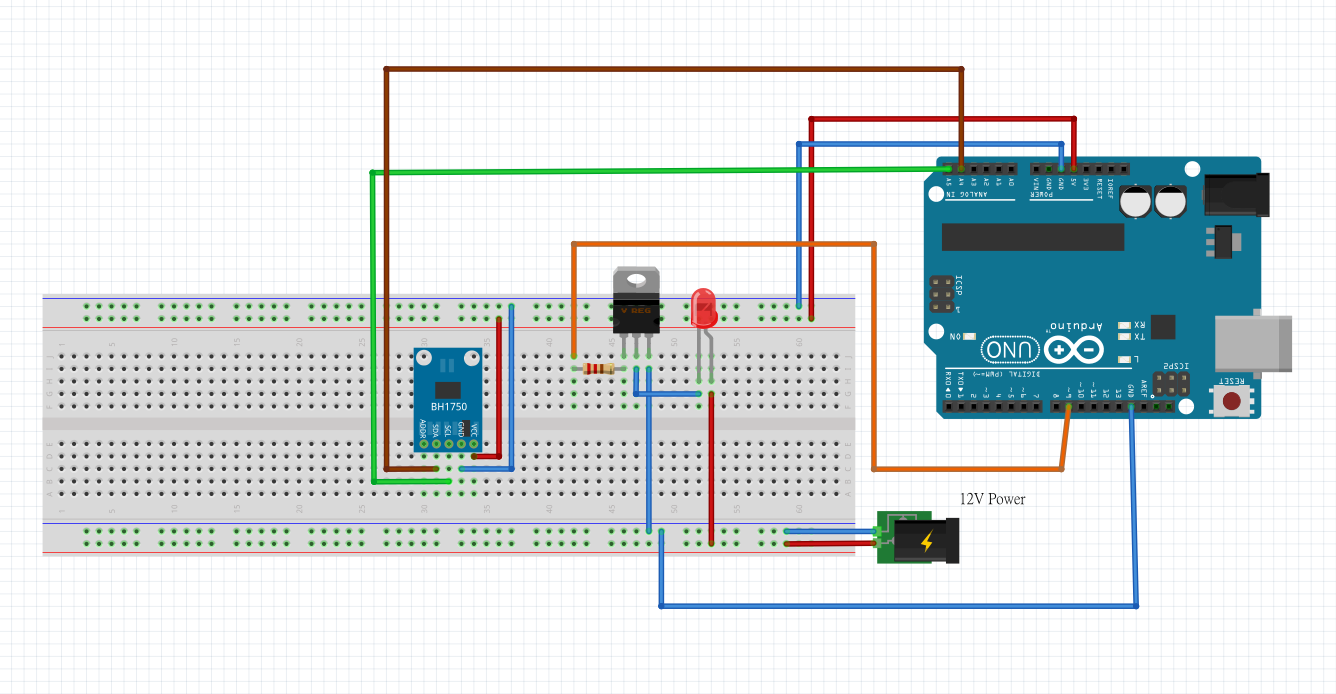
電路圖

程式碼
因為這裡使用 GY-30 的晶片為 BH1750FVI
因此要匯入BH1750FVI Library
/*
  This example uses only 4 wires to test the BH1750 Light sensor

  Connecting the sensor to a NodeMCU ESP8266:
  VCC  <-> 3V3
  GND  <-> GND
  SDA  <-> D2
  SCL  <-> D1

  Connecting the sensor to a Arduino UNO:
  VCC  <-> 3V3
  GND  <-> GND
  SDA  <-> A4/SDA
  SCL  <-> A5/SCL

  Connecting the sensor to a Arduino DUE:
  VCC  <-> 3V3
  GND  <-> GND
  SDA  <-> D20/SDA
  SCL  <-> D21/SCL
*/

#include <BH1750FVI.h>
// 初始化亮度為 0
int brightness = 0;
// Create the Lightsensor instance
BH1750FVI LightSensor(BH1750FVI::k_DevModeContLowRes);

void setup()
{
  Serial.begin(115200);
// 設定 PWM 控制腳位為 PIN9 (控制電燈亮度)
  pinMode(9, OUTPUT);
  LightSensor.begin();
}

void loop()
{
// 取得 GY-30 感測到的 LUX
  uint16_t lux = LightSensor.GetLightIntensity();
// 顯示 LUX
  Serial.print("lux: ");
  Serial.println(lux);
  analogWrite(9, brightness);
// 目標LUX為500
// 過程中會不斷修改電燈亮度
// 直到該區域達到 500 LUX

  if (lux < 500) {
    if (brightness < 255){
      brightness++;
      }
  }
  else{
    if(brightness > 0){
          brightness--;
      }
  }

// 顯示電燈亮度
// 轉換 0~255 數字為百分比
  int brightness_val = map(brightness, 0, 255, 0, 100);
  Serial.print("Lumen: ");
  Serial.print(brightness_val);
  Serial.println("%");
  delay(250);
}