Plex + Rclone 掛載 Google drive 搭建多媒體伺服器
Rclone 掛載 Google drive
安裝EPEL源
sudo yum -y install epel-release安裝一些基本工具
sudo yum -y install wget unzip screen fuse fuse-devel curl安裝Rclone
curl https://rclone.org/install.sh | sudo bash運行Rclone進行配置
rclone config運行畫面:
root@ubuntu:~# rclone config
2018/05/23 16:47:19 NOTICE: Config file "/root/.config/rclone/rclone.conf" not found - using defaults
No remotes found - make a new one
n) New remote
s) Set configuration password
q) Quit config
n/s/q>
選擇n
設定名子,建議設定簡單一點
name>GD_NAME選擇雲端硬碟,這裡使用Google drive
Type of storage to configure.
Choose a number from below, or type in your own value
 1 / Alias for a existing remote
   \ "alias"
 2 / Amazon Drive
   \ "amazon cloud drive"
 3 / Amazon S3 Compliant Storage Providers (AWS, Ceph, Dreamhost, IBM COS, Minio)
   \ "s3"
 4 / Backblaze B2
   \ "b2"
 5 / Box
   \ "box"
 6 / Cache a remote
   \ "cache"
 7 / Dropbox
   \ "dropbox"
 8 / Encrypt/Decrypt a remote
   \ "crypt"
 9 / FTP Connection
   \ "ftp"
10 / Google Cloud Storage (this is not Google Drive)
   \ "google cloud storage"
11 / Google Drive
   \ "drive"
12 / Hubic
   \ "hubic"
13 / Local Disk
   \ "local"
14 / Mega
   \ "mega"
15 / Microsoft Azure Blob Storage
   \ "azureblob"
16 / Microsoft OneDrive
   \ "onedrive"
17 / Openstack Swift (Rackspace Cloud Files, Memset Memstore, OVH)
   \ "swift"
18 / Pcloud
   \ "pcloud"
19 / QingCloud Object Storage
   \ "qingstor"
20 / SSH/SFTP Connection
   \ "sftp"
21 / Webdav
   \ "webdav"
22 / Yandex Disk
   \ "yandex"
23 / http Connection
   \ "http"
Storage> 11
底下的client_id、client_secret、service_account_file、root_folder_id>留空白,按Enter繼續下一步
Google Application Client Id - leave blank normally.
client_id>
Google Application Client Secret - leave blank normally.
client_secret>
底下雲端屬性選1
Choose a number from below, or type in your own value
 1 / Full access all files, excluding Application Data Folder.
   \ "drive"
 2 / Read-only access to file metadata and file contents.
   \ "drive.readonly"
   / Access to files created by rclone only.
 3 | These are visible in the drive website.
   | File authorization is revoked when the user deauthorizes the app.
   \ "drive.file"
   / Allows read and write access to the Application Data folder.
 4 | This is not visible in the drive website.
   \ "drive.appfolder"
   / Allows read-only access to file metadata but
 5 | does not allow any access to read or download file content.
   \ "drive.metadata.readonly"
scope> 1
這裡選擇n,因為我們是進行遠端操控
Use auto config?
 * Say Y if not sure
 * Say N if you are working on a remote or headless machine or Y didn't work
y) Yes
n) No
y/n> n
複製底下的連結貼上至Browser
If your browser doesn't open automatically go to the following link: https://accounts.google.com/o/oauth2/auth?access_type=offline&client_id=202264815644.apps.googleusercontent.com&redirect_uri=urn%3Aietf%3Awg%3Aoauth%3A2.0%3Aoob&response_type=code&scope=https%3A%2F%2Fwww.googleapis.com%2Fauth%2Fdrive&state=4a9024993bd9861035263e3bbb7f3b14
Log in and authorize rclone for access
選擇自己的帳號進行登錄
複製裡面授權碼,並貼到機器裡面
是否設定為團體硬碟,選擇n
Configure this as a team drive?
y) Yes
n) No
y/n> n
成功後畫面如下
Current remotes:

Name                 Type
====                 ====
GD_NAME              drive

e) Edit existing remote
n) New remote
d) Delete remote
r) Rename remote
c) Copy remote
s) Set configuration password
q) Quit config
e/n/d/r/c/s/q>
GD_NAME就是剛剛設定的名稱
到這裡我們就可以進行掛載Rclone的動作啦
掛載Rclone
首先創建一個掛載檔案的資料夾
注意:小心目錄路徑的權限,權限沒設對的話,Plex會找不到檔案。
mkdir -p /gdrive用screen創建一個新視窗
screen -S rclone進入後,值行以下命令進行掛載
rclone mount GD_NAME: /gdrive --allow-other --allow-non-empty --vfs-cache-mode writes這時畫面會沒有動靜
按下 Ctrl + a 後,再按下 d 鍵(detach),這時候整個 screen 就會被卸離。
到時想連接回去時輸入
screen -r 輸入df -h確認是否掛載成功
root@ubuntu:/gdrive# df -h
Filesystem      Size  Used Avail Use% Mounted on
udev            1.9G     0  1.9G   0% /dev
tmpfs           393M  6.5M  386M   2% /run
/dev/sda1        36G  5.8G   28G  18% /
tmpfs           2.0G  7.2M  2.0G   1% /dev/shm
tmpfs           5.0M  4.0K  5.0M   1% /run/lock
tmpfs           2.0G     0  2.0G   0% /sys/fs/cgroup
tmpfs           393M   84K  393M   1% /run/user/1000
GD_NAME:        115G   19G   97G  16% /gdrive
掛載成功的話,寫個開機自啟腳本
開機自動掛載腳本
新建一個rclone.service文件:
vim /usr/lib/systemd/system/rclone.service貼上以下內容:
[ Unit ]
Description = rclone
[ Service ]
User = root
ExecStart = /usr/ bin / rclone mount GD_NAME: /gdrive --allow-other --allow-non-empty --vfs-cache-mode writes
Restart = on - abort
[ Install ]
WantedBy = multi - user . target
變更權限:
chmod 660 /usr/lib/systemd/system/rclone.service重載daemon,讓新的服務文件生效:
systemctl daemon - reload用systemctl來啟動rclone:
systemctl start rclone設置開機啟動:
systemctl enable rclone查看狀態:
systemctl status rclone重啟你的VPS,然後查看一下rclone的服務起來沒,接著查看一下盤子掛上去沒:
reboot
systemctl status rclone
df - h
安裝Plex
這裡是使用centos 7版本
其他版本請到這裡查看:https://www.plex.tv/downloads/
rpm -ivh https://downloads.plex.tv/plex-media-server/1.13.0.5023-31d3c0c65/plexmediaserver-1.13.0.5023-31d3c0c65.x86_64.rpm安裝完成後
建立開機自啟
systemctl enable plexmediaserver.service啟動Plex
systemctl start plexmediaserver.service防火牆設定
因為 Plex 使用的 Port 是32400
使用firewalld進行設定
sudo firewall-cmd --zone=public --permanent --add-port=32400/tcp
sudo firewall-cmd --zone=public --add-port=32400/tcp
使用iptables進行設定
sudo iptables -A INPUT -p tcp  –dport 32400 -m state –state NEW,ESTABLISHED -j ACCEPT
sudo iptables -A OUTPUT -p tcp –sport 32400 -m state –state ESTABLISHED -j ACCEPT
因為Plex要進入同一個網段才能進行初始設定
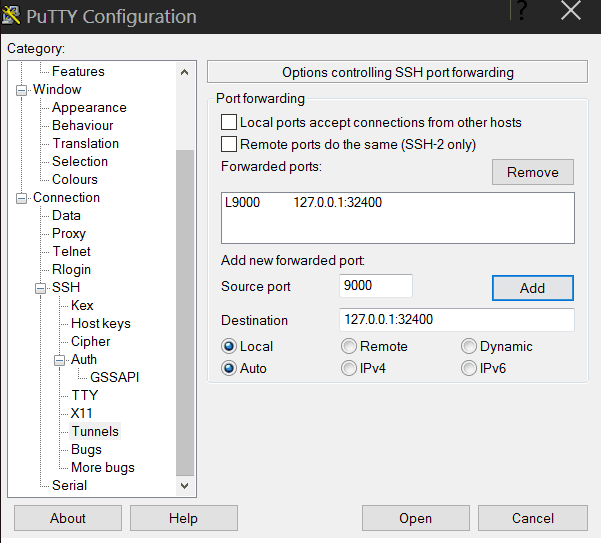
進入putty connection > SSH > Tunnels
下設置source port 9000, destination 127.0.0.1:32400,然後點擊Add。
點擊putty登錄,然後打開瀏覽器,訪問http://127.0.0.1:9000/web,這時你就可以看到Plex的Web界面了。
接下來進行註冊Plex帳戶
用完後,新增媒體庫,選擇我們創建的料夾,接下來就讓他慢慢的跑吧,需要頗久的時間。
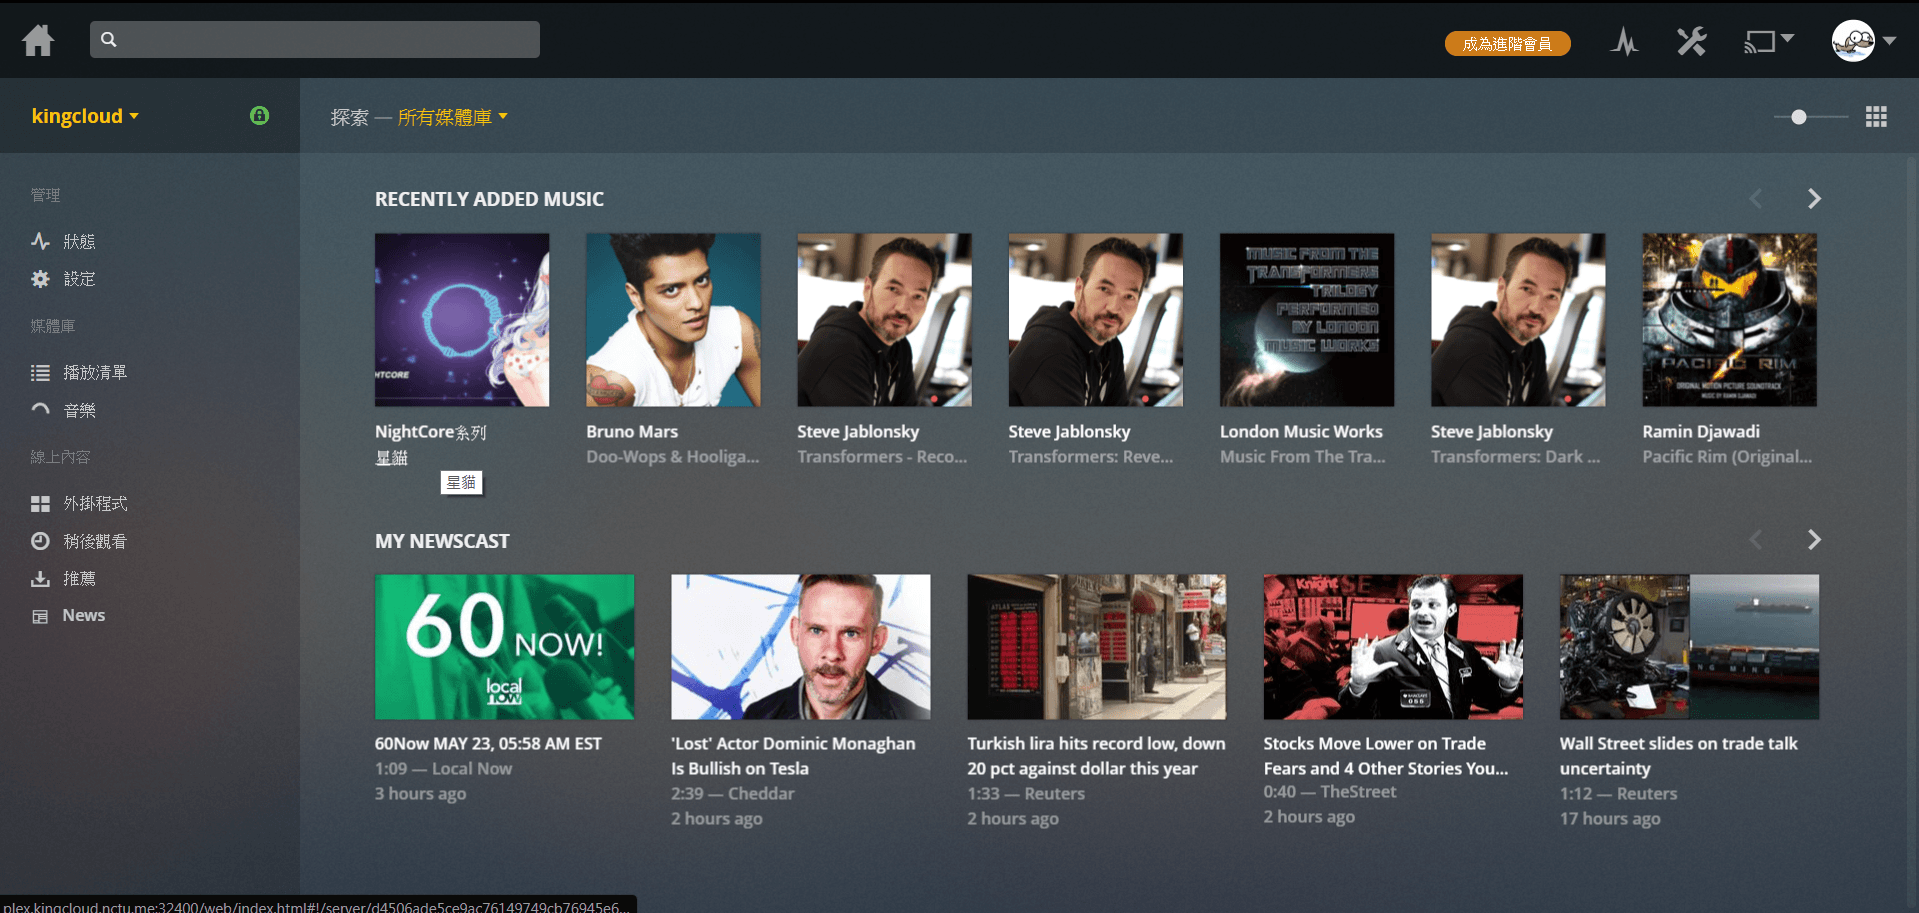
完成後的畫面,一整個美滋滋的阿(´▽`)
4 comments
博主真是太厉害了!!!
Regards, An abundance of tips.
太屌了吧 好酷教我
看到這個分享讓我很驚艷~~~
但可否有更詳細的講解呢~ 跪求orz